- Make a assignment sub-directory (hw6)
and copy the
prepared files
into your assignment sub-directory:
     mkdir   ~/cs355/hw6

     cp  /home/cs355001/Handouts/hw6/*  ~/cs355/hw6
You will copy these files:
   basic.h          - the circuit components used in hw6

   help-DataPath    - the main simulation program file
                      It creates switches and probes to help you test
                      the circuit that you must make in the assignment

   datapath.h       - This file contains the circuit that you must make
                      for assignment 6 (turn this file in)

   run-hw6          - An application to compile and run the hw6 assignment


Sample programs showing new circuits used in this assignment:

   sample-Dec       - example circuit to show you how to use the
                      built-in Decoder component
   sample-Const     - example circuit to show you how to use one of the
                      Constant components in basic.h
   sample-Reg       - example circuit to show you how to use
                      ResetableReg16 component in basic.h

Other files that you MUST NOT change:

   alu-shf.o 	    - My (correct) ALU16 and SHIFTER16 circuit from assignment 3
   clock.o  	    - My (correct) Four_Phase_Clock circuit from assignment 4
   mir.o	    - A MIR with a number of test instruction
- Warnings:
- Do not make
your own:
- Multiplexor
Instead, use EDiSim's built-in Mux component (that you learned to use in assignment 4 !!!)
- Decoder
Instead, use EDiSim's built-in Dec component that I will describe below in this writeup.
- You do not need to
use any D-flipflop in this
assignment.
Instead, use the ResetableReg16 (a 16 bits register) component that I have provided in basic.h. I described how to use this component below in this writeup.
- Multiplexor
- So make sure to read the
"New circuits that you need in this assignment"
(click here)
section in this write up
will show you how to:
- Use the built-in decoder
- Use the ResetableReg16 component (provided in basic.h)
- Several new circuits that I made in the basic.h file that you can use in assignment 6
- Do not make
your own:
- In this assignment, you will
make the DataPath component
which is the
heart of the CPU
When you're done with this assignment, your datapath will be able to execute machine instructions stored in the MIR. The MIR already contains 10 machine instructions for you to test your data path - see below in the write up for their descriptions. You will use them to test the correctness of your data path.
- In order to make the
DataPath component, you will
need some
components that we
made in previous assignments
- The Handouts that you have
copied includes
my solutions of
assignments 3 and 4
You can use these circuits in you datapath as if they are built-in cuircuits:
 Define ALU16     a[15..0] b[15..0] c[1..0] | s[15..0] n z;

 Define SHIFTER16 a[15..0] c[1..0]          | s[15..0];
(In other words: you do not need to define them yourself. Just use it as if they have been defined)
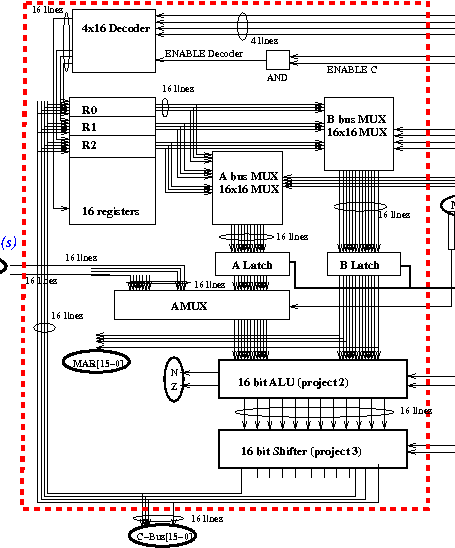
- The datapath circuit
that you need to construct
for this assignment is as follows:
Here is a diagram of the circuit test environment with the datapath circuit to give you the context in which the datapath circuit is used:
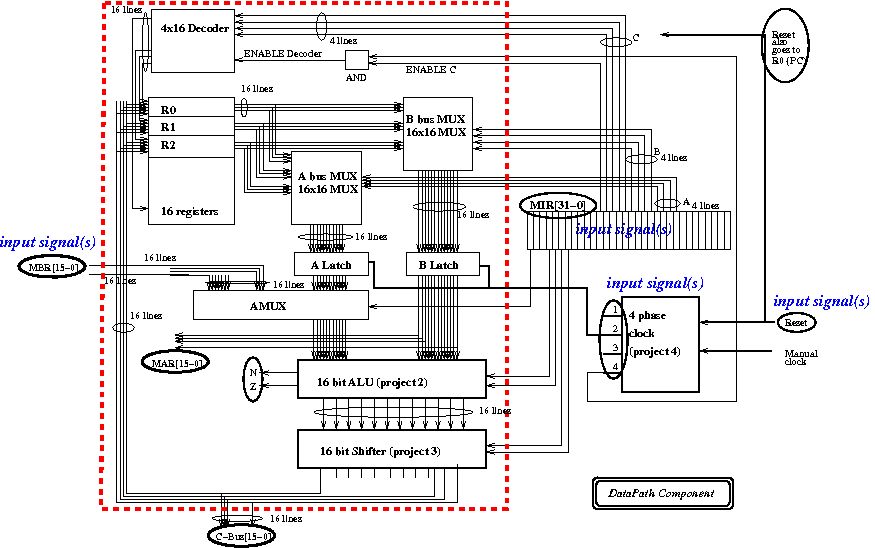
The datapath component is the portion of the circuit within the read dotted bold lines in the figure.
Notice that the DataPath component contains the 16-bit ALU and 16-bit shifter from previous assignments.
These components have already been included by the circuit test environment main assignment file help-DataPath, so you can use them as if they are "built-in" components.
- For this assignment, you need to define (=write)
the following
DataPath
circuit component in EDiSim:
/* =================================================================
   Pj6 code begins here

   Write the DataPath macro according to the handout
   ================================================================= */

Define DataPath mir[31..0] mbr[15..0] Phase[3..0] Reset |
                R0[15..0]  R1[15..0]  R2[15..0]  R3[15..0]  R4[15..0]
                R5[15..0]  R6[15..0]  R7[15..0]  R8[15..0]  R9[15..0]
                R10[15..0] R11[15..0] R12[15..0] R13[15..0] R14[15..0]
                R15[15..0] A[15..0]   B[15..0]  ALatch[15..0] BLatch[15..0]
                AMux[15..0] aluOut[15..0] C[15..0] N Z;

/* Write EDiSim code here to execute the micro instruction in mir[31..0] */

Endef;
- The DataPath
component has the following
input signals:
- mir[31..0]: is the
micro instruction
that the DataPath component
must execute !!!!
- The mir[31..0] is a 32 bit value: mir[31]..mir[0]
The meaning of the bits in the micro-instructions is summarized in this figure:
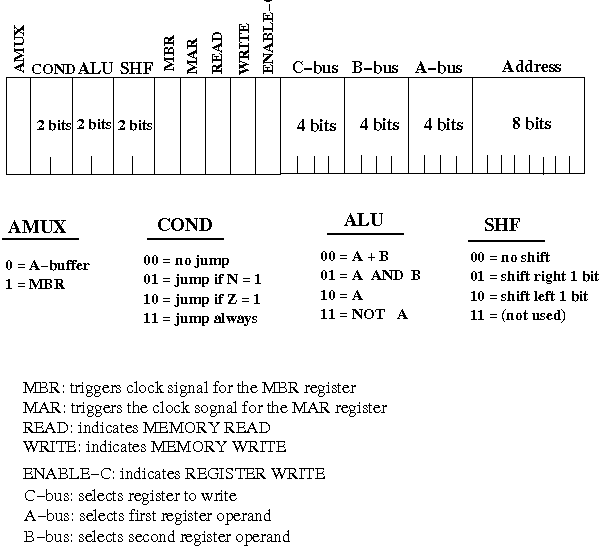
Note:
- mir[31] is the AMux bit !!!
Make sure you use the correct bit positions to control the various components in the datapath !!!
- mbr[15..0]:
is the 16 bits of the MBR
- mbr is an 16 bit value: mbr[15]..mbr[0]
The mbr can be used an a source operand in some of the machine instructions
- Phase[3..0]: is the
Four Phase clock
- Phase is an array: Phase[3]..Phase[0]
Note:
- Use Phase[0] for phase 1 of the 4 phase clock
- Use Phase[1] for phase 2 of the 4 phase clock
- Use Phase[2] for phase 3 of the 4 phase clock
- Use Phase[3] for phase 4 of the 4 phase clock
We use an array for brevity.
- Reset:
is the reset signal
The Reset signal is used to reset (1) the Four Phase clock and (2) all the CPU registers that are constructed with the ResetableReg16 component
- mir[31..0]: is the
micro instruction
that the DataPath component
must execute !!!!
- The DataPath component
has the following output signals:
- R0[15..0] through
R15[15..0]:
are the 16 registers
in the datapath
- Each register is 16 bits in length: R0[15]..R0[0], R1[15]..R1[0], and so on
- ABus[15..0] and
BBus[15..0] are
the signals on the
A-bus and
B-bus
(These outputs will let you see which registers are selected)
- ABus[15..0] and BBus[15..0]: are 16 bits in length: ABus[15]..ABus[0] and BBus[15]..BBus[0]
- ALatch[15..0] and
BLatch[15..0]:
are the signals
at the input of the
ALU
(sent out by the A- na
d B-latches)
(These outputs will let you see the input values used by the ALU)
- ALatch and BLatch: are 16 bits in length: ALatch[15]..ALatch[0] and BLatch[15]..BLatch[0]
- AMux[15..0]: is the
output of the
A-Mux component
which determines whether
the ALU will use
the data in the A-Latch or the
data in the MBR.
(These outputs will let you see whether the ALatch data or MBR was selected)
- AMux is 16 bits in length: AMux[15]..AMux[0]
- ALU[15..0]: is
the output of the
ALU
(These outputs will let you see the function performed by the ALU.)
- ALU is 16 bits in length: ALU[15]..ALU[0]
- CBus[15..0]: is the
output of the Shifter
(on the C-Bus that leads to the
registers)
(These outputs will let you see the the value that is sent to the inputs of the registers)
- CBus is 16 bits in length: CBus[15]..CBus[0]
- N and Z: are the N-flag and Z-flag of the ALU, respectively.
- R0[15..0] through
R15[15..0]:
are the 16 registers
in the datapath
- Note/Comment:
- The datapath component
has been discussed and
demonstrated in class.
This assignment is to re-enforce the material taught in a hands on manner. By building the CPU yourself, you have to opportunity to experiment and understand better how the CPU work.
The function (= operation) of the DataPath component is to execute a micro-instruction, i.e., do exactly what the micro-instruction tells it to do (not more and not less).
The input mir (32 bits array) is the micro-instruction that the DataPath component must execute.
The meaning of each bit in the mir is the same as discussed in class (see this webpage: click here).
- When your assignment is done,
you will be able to control the execution manually
using the switch that controls the 4-phase clock.
Therefore, you can decide how fast or how slow the computer will run.
Students in the past years have found this assignment to be the most exciting one of all. Some students really get a kick out of seeing the DataPath perform the operations. Hope you too will be able to make your datapath "come alive" and enjoy your own toy computer.
- The datapath component
has been discussed and
demonstrated in class.
- Decoder:
how to
use the built-in
Dec (decoder) circuit
- What
is a decoder ---
study the course notes here:
click here
Where and how to use a decoder to select a register for writing --- study the course notes here: click here
- Syntax for using
a Dec component:
Dec coord ONE N sel-signals | 2^N outputs ;
Example: how to make a decoder with 3 selection signals that selects one of 2^3 = 8 outputs
Dec cb-eb ONE c[2..0] | out[7..0] ;
Sample code: see sample-Dec in the assignment handout files (that you copied into your hw6 directory)
- What
is a decoder ---
study the course notes here:
click here
- You will also need to use the following
circuits
to write the DataPath component.
These circuits are defined in the basic.h that was copied in the preparation step. They are available for you to use in this assignment.
- ResetableReg16:
a 16 bit register that can be
reset to
0000000000000000
using a reset input signal.
  Syntax:

          ResetableReg16  coord  in[15..0]  ld  reset  |  out[15..0];

  Inputs:   in[15..0]   =  16 input bits
            ld          =  signal used to write the register (memory)
                           when reset = Zero
	    reset          One:  reset value in register to 0000000000000000
                           Zero: clk can now be used to write value into register

  Output:   out[15..0]  =  the 16 bits value stored in the register
Example on how to use this component:
- See sample-Reg example circuit
Note:
- Use the ResetableReg16 component to construct registers R0, R1, R2, R3, R4, R10, R11, R12, R13, R14, R15, ALatch and BLatch.
- Constants:
a
16 bit "constant" values
I have made a number of constants in basic.h that you can use to construct the constant registers in the DataPath.
Use the following EDiSim code to make registers R5, R6, R7, R8 and R9:
   Const_0      aa  |  R5[15..0];
   Const_1      aa  |  R6[15..0];
   Const_minus1 aa  |  R7[15..0];
   Const_AMASK  aa  |  R8[15..0];
   Const_SMASK  aa  |  R9[15..0];
Example on how to use these "Constants" components:
- See sample-Const example circuit
-
Run your assignment using the command:
    (Make sure you are in your hw6 folder - use this command to go there: cd ~/cs355/hw6)

    bash run-hw6
- What to do next:
- Press F2 to get rid of the connection lines....
- Resize the
window to
the maiximum size that
fit your screen
- Press 'b'
once
to activate the CPU circuit
- 'b' is the reset button. When pressed, the CPU will reset to the initial state
Notice that the 4-phase clock (located at middle left of the screen) is at phase 1
You must select the micro-instruction (see below) while the 4-phase clock is at phase 1
- Repeat as often
as you like
-
When the 4-phase clock
is
at phase 1:
Use keys
'3', '2', '1', '0' to
select a micro-instruction that
you want to execute
I only have the following 10 instructions available:
   Memory Location     Micro-instruction
   =================================================================
      0		       Copy R7 to R1
      1		       Copy MBR input to R0
      2		       Add MBR input and R6 and store result in R10
      3		       Add R6 and R7 and store result in R11
      4		       Not R6 and store result in R12
      5		       Left Shift R7 and store result in R13
      6		       Right Shift R7 and store result in R14
      7		       R15 = Right shift (Not R6)
      8		       R15 = 2*R7
      9		       R15 = 4*R7
- After selecting the micro-instruction,
toggle the key
'a' exactly
4 times
to execute the
selected micro-instruction
- While toggling 'a',
you will see the 4-phase clock
move from 1 ⇒ 2 ⇒ 3 ⇒ 4
⇒ 1
- When the 4-phase clock is back to
phase 1, you have
executed the
selected micro-instruction.
(When the 4-phase clock is back at phase 1, you can select another micro-instruction to execute)
- While toggling 'a',
you will see the 4-phase clock
move from 1 ⇒ 2 ⇒ 3 ⇒ 4
⇒ 1
-
When the 4-phase clock
is
at phase 1:
Use keys
'3', '2', '1', '0' to
select a micro-instruction that
you want to execute
To test your DataPath component, you must fist complete (i.e., write) the DataPath component in the skeleton assignment file "datapath.h".
- You can
build this assignment up
in a piecemeal fashion:
- Define the 16 registers and
the circuitry used to
select them
When you are done:
- Test to see if
you can reset
the register R0 with the
Reset signal
- Test to see if the micro-instructions in the MIR selects the registers correctly
- Test to see if
you can reset
the register R0 with the
Reset signal
- Define the A/B-Latches and
the circuitry used to
write them
When you are done:
- Test by running the 4-phase clock to Phase 2 to see if the selected register is stored into the A/B-lacthes during Phase 2
- And so on, just follow the
data flow through the
DataPath and
create the
circuits at the next step
in the DataPath
Test the correct operation of these newly added circuit before going on to the next step in the DataPath
(I don't want to detail all the steps. If you understand the material presented in class, you will know what to do. And if you do not understand the material, then this assignment is an opportunity for you to work it out and if you're stuck, come ask questions)
Note:
- Not every micro-instruction
will be suitable for
testing purpose
while
you are building up
the DataPath
- Find and
use
the appropriate
micro-instruction(s) to
test the
new circuitries that
you have added
(I let you figure out which instruction(s) that you can use - it will challenge/help you with the understanding of the operation of the datapath).
- Define the 16 registers and
the circuitry used to
select them
- Turn in your datapath.h
file using the following command:
/home/cs355001/turnin datapath.h hw6
- Each assignment must be
turned in before the
specified dead line
(see class webpage for the
deadline)
- You can request upto 3 extensions
in the semester
without any penalties without
any questions asked
(A 4th extension request will be automatically denied --- personal emergencies and illiness with documentation will receive a "free" extension)
- To request an
extenion for this assignment,
us the following
command:
/home/cs355001/req-ext hw6